

RESOLVE PROBLEMS OPENING QUICKBOOKS DESKTOP OR YOUR COMPANY FILE
If you are having problems opening QuickBooks Desktop, this is a great place to start troubleshooting! You may be experiencing problems opening the QuickBooks program, specific QuickBooks company files, or other issues with opening QuickBooks Desktop.
Before You Start Troubleshooting
- Before troubleshooting the company file, make sure the issue is related to the company file rather than the program itself. Also, make sure that QuickBooks is updated to the latest release. See Update QuickBooks Desktop to the latest release.
- Press and hold the Ctrl key while double clicking the QuickBooks Desktop icon. Note: Do not let go of the Ctrl key until you have the No Company Open window in QuickBooks.
- If the program fails to open while holding the Ctrl key, see QuickBooks Desktop does not start for steps to resolve, as the following will not help.
- If the program does open, proceed below.

- Verify that only one computer is hosting your company file. Turn off hosting in all computers aside from the server.
- From the QuickBooks File menu, select Utilities.
- Click Stop hosting multi-user access. Quick tip: If you see anything other than Stop hosting multi-user access, it mean s hosting is currently turned off on that computer.
- Once you verify that hosting is disabled, proceed below.
- Make sure that your QuickBooks Desktop Program is not corrupted. Open a sample company file and if you get an error, proceed to troubleshooting Solution 7 QuickBooks Desktop Installation.
If these steps fail to resolve your issue, proceed below to follow the details steps.
Solution 1: Open the QuickBooks Company File directly from QuickBooks Desktop
If you have determined with the steps above, that you are having problems with only one compan file (not the program itself), then sometimes moving it to your Windows desktop can help if there are any folder permission issues.
- From the QuickBooks File menu, select Open or restore company.
- Select the appropriate radio button for the type of file that you are trying to open.
- Browse the location of the file.
- Select the file and click Open. Note: You will be prompted to select the location where you want to restore the file if you are opening a .QBX, .QBB or .QBM file.
Solution 2: Prevent QuickBooks Desktop Windows from Automatically Opening
If there are many windows opened in your company file, try supressing them from opening automatically.
- On the No Company Open window, select the company file.
- Press and hold the ALT key and click Open.
Note: If QuickBooks displays a log in window, type in the password, press and hold the ALT key and click OK. Do not let go of the ALT key until the company file opens fully or an error message is displayed.If you are able to open the company file without error, follow the steps bellow.
- From the Edit menu, click Preferences.
- Click Desktop View and select Don’t save the desktop.
- Click OK.
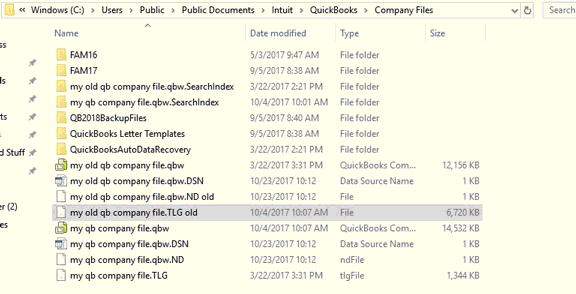
Solution 3: Rename the .TLG and .ND Extensions on Your QuickBooks Company Files
If the TLG and ND files (special file types that accomany your company file) become damaged, renaming them to old can help the file open.
- Open the folder where the QuickBooks company file is saved.
- Right-click the transaction log file and rename it to [company file name]OLD.qbw.TLG. It has the same name as the company file with a .tlg file extension. Quick tip: Follow the same process in order to rename the .ND file.
- Open the company file. QuickBooks will automatically create a new .TLG and .ND files.
Important:
- Deleting .TLG files are not recommended as it can be used to recover lost data.
- To prevent the error from happening again, always copy the transaction log file with the company file when moving data from one computer to another.
Solution 4: Copy the QuickBooks Company File to a New Location
If the company file is located to a network drive, copy it to the local drive of the computer you are working on. If the local file opens, troubleshoot your network configuration. You can download and run the QuickBooks File Doctor to help you with this process.
- Create a new folder in your C: drive.
- Open the folder where the company file is saved.
- Press and hold the Ctrl key. Select the company file (.qbw) and the corresponding .TLG of your company file.
- Right-click and select Copy.
- Open the new folder. Right-click and select Paste. Quick tip: If you cannot paste the file to the new location and the file is networked, someone else may be using the file. Ask this user to log out of the file and attempt to copy the file again.
Solution 5: Check the Properties and File Extension
- Open the folder where the company file is saved.
- Right-click the company file and select Properties.
- Make sure the Type of File is QuickBooks Company file and the File size is at least 7MB.
- Click Advanced and make sure that boxes for Compress and Encrypt attributes are unchecked.
- Click OK
Sometimes, a file may have the wrong extension for the type of file. See file extensions used in QuickBooks Desktop for more information.
Solution 6: Rename the QuickBooks Company File
- Open the folder where the company file is saved.
- Right-click the file and select Rename.
- Change the name of the file to something that is not more than 3 letters. Important: Make sure to keep the original file extension (.qbw, .qbb, etc)
- If .TLG is available for that file, rename it as well.
Note: If the file does not show an icon or 3 letter extension, or if it shows the wrong icon or extension, you will need to add or edit the file extension depending on the type of file. For more information, see file extensions used in QuickBooks Desktop.
Solution7: Troubleshoot the QuickBooks Desktop program installation
If possible, try moving your QuickBooks company file to another computer and opening it there. If it opens on this computer, there are problems on the first computer with QuickBooks, or the system itself.
Go through the following steps, testing the company file after each one until it opens successfully.
- Run the QBInstall Tool.
- Repair the QuickBooks installation.
- Reinstall using a clean install.
Host your company data file in multi-user mode
This article provides detailed information on QuickBooks Desktop hosting. If you would prefer how-to help, we recommend these articles:
- Setting Up a Network or Multi-User Environment
- Error H101, H202, H303, or H505 when opening your company file to resolve multi-user issues
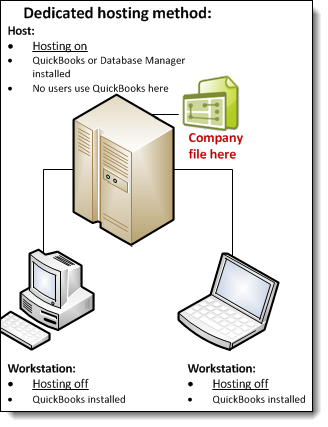
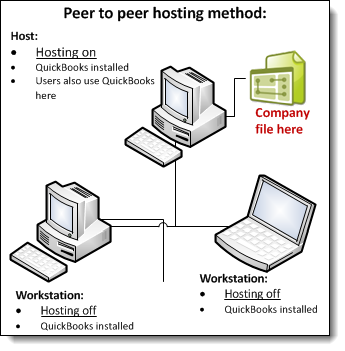
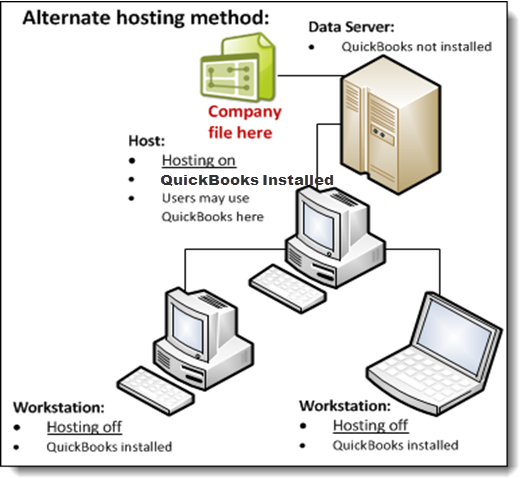
Hosting Defined
The term hosting is used to describe the situation where the computer that is storing a company file (the host) allows other computers to access the file.
QuickBooks uses a service to manage company file access:
- QuickBooks 2019 uses QuickBooksDB29
- QuickBooks 2018 uses QuickBooksDB28
- QuickBooks 2017 uses QuickBooksDB27
- QuickBooks 2016 uses QuickBooksDB26
In Windows Control Panel, you can find this service in User Accounts, under Users for this computer. Look for the service that corresponds to your version of QuickBooks Desktop.
The following diagrams illustrate QuickBooks Desktop hosting modes.
CONFIGURE FIREWALL AND INTERNET SECURITY SETTINGS FOR QUICKBOOKS DESKTOP
You may encounter errors if your firewall blocks Internet access needed for specific QuickBooks programs or files.
Updating your firewall to the latest release may resolve the issue or you may need to manually configure your firewall software.
Note: Intuit does not support firewall and anti-virus software. You may need to contact your program’s provider for assistance in installing and setting up your program.
Configure firewall ports automatically
Running the QuickBooks File Doctor automatically opens firewall ports. This tool can be used to configure Windows Firewall. See QuickBooks File Doctor: Fix your company file or network (US, CA, and UK) for more information.
Manually configure exceptions and ports to your Firewall
| QuickBooks Desktop 2019 now uses dynamic ports! These are specific ports (not a range) assigned during installation to ensure QuickBooks Desktop uses a given port exclusively. The port format for QuickBooks Desktop 2019 is: 8019, XXXXX; where XXXXX is the port number specifically assigned. |
To get the dynamic port number for QuickBooks 2019:
- Open QuickBooks Database Server Manager.
- On the Port Monitor tab, find QuickBooks Desktop 2019.
- Note the Port Number, which is what you will use for your firewall port exception.
Important: Port assignment can be changed by selecting Renew, however you will have to go to the Scan Folders tab and click Scan Now to re-set the firewall permissions. You can only renew 2019 ports, 2018 and below use static ports defined below.
QuickBooks Desktop 2018 and older versions use static ports, with given range per year version. It follows the port format:8019, XXXXX, XXXXX-XXXXX.
Add Firewall port exception for QuickBooks
IMPORTANT: If you’ve installed, or will be using multiple year versions of QuickBooks Desktop, you will need to perform the following for each year version.
- From Windows search bar, enter then open Windows Firewall.
- Select Advanced Settings.
- Right-click Inbound Rules and select New Rule.
- Select Port, then select Next.
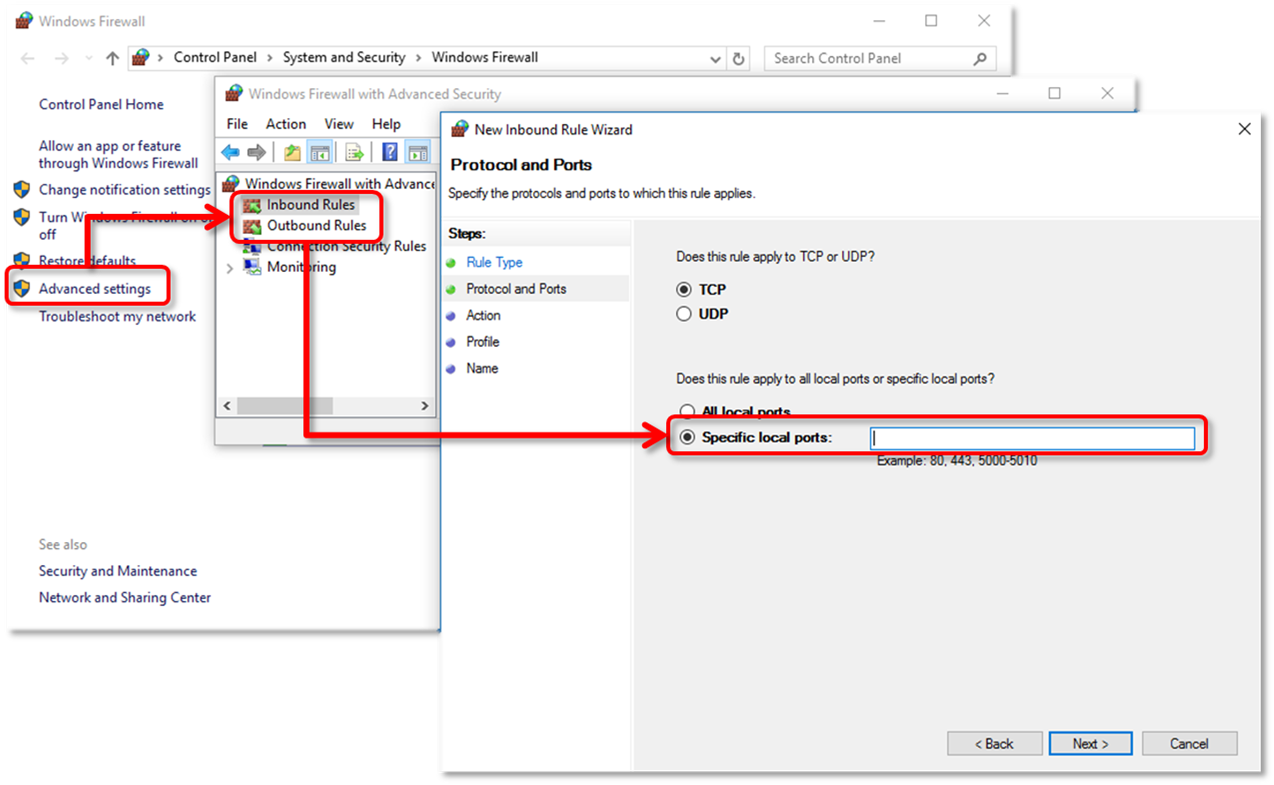
- Make sure TCP is selected. Enter the specific ports needed for your QuickBooks year version, then select Next.
QuickBooks Desktop 2019: 8019, XXXXX
(XXXXX is the assigned port number found in QuickBooks Database Server Manager)
QuickBooks Desktop 2018: 8019, 56728, 55378-55382
QuickBooks Desktop 2017: 8019, 56727, 55373-55377
QuickBooks Desktop 2016: 8019, 56726, 55368-55372 - Select Allow the Connection, then Next.
- If prompted, make sure all profiles are marked, then select Next.
- Give the rule a name, such as QBPorts(year). Select Finish when done.
- Repeat the steps above for the Outbound Rules (for step 3, choose Outbound Rules instead of Inbound).Try opening QuickBooks Desktop again in multi-user mode or over your network to see if the issue has been resolved.
If you’re still experiencing errors or problems with connectivity, make exceptions to programs QuickBooks uses in Windows Firewall.
Create Firewall exceptions for QuickBooks programs
QuickBooks uses executable files to perform various functions. See Configure your Anti-virus or Firewall Programs section for a list of executable files then perform the following steps for each file.
- From Windows search bar, enter then open Windows Firewall.
- Select Advanced Settings.
- Right-click Inbound Rules and select New Rule.
- Select Program, then Next
- Select This Program Path, then Browse.
- Navigate the file location, then select Next.
- Select Allow the Connection, then Next.
- If prompted, make sure all profiles are marked, then select Next.
- Give the rule a name, then select Finish.
- Repeat the steps above for the Outbound Rules (for step 3, choose Outbound Rules instead of Inbound).
Configure your Anti-virus or Firewall Programs
Note: Only perform this if configuring the Windows Firewall does not resolve the issue.
- Due to the vast number of firewall programs available and their ever changing versions, Intuit is unable to provide additional configuration steps. Refer to your software’s documentation or the software publisher’s web site for support.
- Intuit does not support or maintain steps on the various internet security programs on the market today. In most cases, you should be fine just adding the ports above to the Windows Firewall. If you still encounter errors opening a file over a network or multi-user problems, you may want to try adding the following executable/directories to your 3rd party virus program.
Add QuickBooks ports exception on your Antivirus or Firewall
Make sure TCP is selected, and enter the ports needed for your QuickBooks year version. See the port number for your QuickBooks version in Manually configure exceptions and ports section. If you have installed, or will be using multiple year versions of QuickBooks Desktop, you will need to add each year’s ports.
Add the following executable files on your Antivirus or Firewall
Note: If you see Program Files (x86), go there as that means you are on a 64-bit Operating system.
| Executable files | Location |
| AutoBackupExe.exe | C:\Program Files\Intuit\QUICKBOOKS YEAR |
| Dbmlsync.exe | C:\Program Files\Intuit\QUICKBOOKS YEAR |
| DBManagerExe.exe | C:\Program Files\Intuit\QUICKBOOKS YEAR |
| FileManagement.exe | C:\Program Files\Intuit\QUICKBOOKS YEAR |
| FileMovementExe.exe | C:\Program Files\Intuit\QUICKBOOKS YEAR |
| QuickBooksMessaging.exe | C:\Program Files\Intuit\QUICKBOOKS YEAR |
| QBW32.exe | C:\Program Files\Intuit\QUICKBOOKS YEAR |
| QBDBMgrN.exe | C:\Program Files\Intuit\QUICKBOOKS YEAR |
| QBGDSPlugin.exe | C:\Program Files\Intuit\QUICKBOOKS YEAR |
| QBServerUtilityMgr.exe | C:\Program Files\Common Files\Intuit\QuickBooks |
| QBCFMonitorService.exe | C:\Program Files\Common Files\Intuit\QuickBooks |
| QBLaunch.exe | C:\Program Files\Common Files\Intuit\QuickBooks |
| QBUpdate.exe | C:\Program Files\Common Files\Intuit\QuickBooks\QBUpdate |
| IntuitSyncManager.exe | C:\Program Files\Common Files\Intuit\Sync |
| OnlineBackup.exe | C:\Program Files\QuickBooks Online Backup |