

Register or activate QuickBooks Desktop
Every time you install QuickBooks Desktop, you need to register or activate the software. Note that if you have multiple copies of QuickBooks Desktop, you need to register or activate each one.
Critical Internet Explorer update neededTo provide greater security and stability, all connections used by QuickBooks Desktop to access Intuit services will need to meet certain system requirements after May 31, 2018. Make sure your Internet Explorer uses TLS 1.2 to keep features like Payroll, Online Banking, and Payments working. To learn more about this, see Operating System, Internet Explorer and .Net framework requirements for QuickBooks Desktop 2016 and later. |
To register or activate QuickBooks Desktop
For 2016 and newer versions
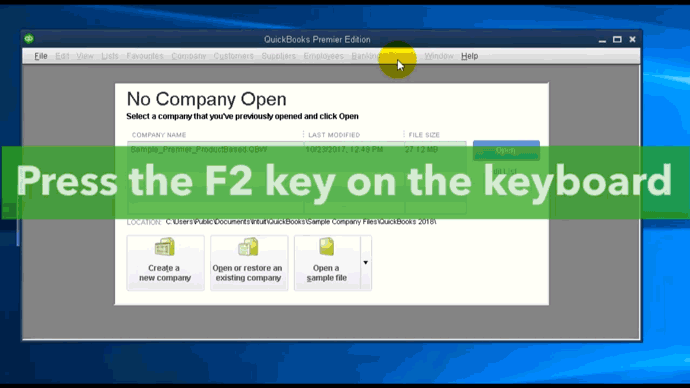
QuickBooks Desktop for Windows
- With QuickBooks open, press F2 on your keyboard.
- On the Product Information window, check the registration status at the right side of the License number.
- If QuickBooks says ACTIVATED, you're all set!
- If QuickBooks is NOT ACTIVATED:
- Select OK to close the Product Information window.
- Go to the Help menu, then select Activate QuickBooks.
Note: For 2016, select Register QuickBooks. - Follow the on-screen prompts to verify your information, then complete the activation process.
QuickBooks Desktop for Mac
- Go to the QuickBooks menu, then select Register QuickBooks.
- Enter the License Number and Product Number, then select Next.
- Select Register Online.
- Follow the on-screen instructions to complete the registration.
- If the register option does not appear, the software is already registered.
For older versions
Inline with Intuit's discontinuation plan for older products, discontinued products cannot be registered for the first time. You may re-register discontinued products if they have been registered before and are being reinstalled. You can contact us to get the validation code, but note that assisted support for discontinued products is no longer available.
Issues with registering or activating QuickBooks Desktop
- If the information you entered is not accepted, make sure it's the same information you gave at the time of purchase.
- If you have technical issues such as a blank screen or error message, try temporarily disabling your antivirus software.
- If purchased from a retail store, activate QuickBooks using the code that can be found on the box.
- If you cannot register on your own, contact us to register over the phone
WHAT IF I'M HAVING TROUBLE REGISTERING/ACTIVATING QUICKBOOKS DESKTOP?
When prompted to verify your information, you should make sure to provide the same information that you gave at the time of purchase. If it doesn't match perfectly, it won't be accepted.
If you have a technical issue like a blank screen or an error message, try temporarily disabling your anti virus software, as it may be interfering with the registration process.
Finally, if you are not able to register on your own, you can contact us (US, Canada or UK) to register over the phone.
FOR USERS WITH OLDER QUICKBOOKS DESKTOP SOFTWARE:
In keeping with Intuit's discontinuation plan for older products, discontinued products cannot be registered for the first time. See the QuickBooks Desktop service discontinuation policy and upgrade information (US, Canada or UK).
You may re-register discontinued products if they have ever been registered before on any computer and are being reinstalled. If you do, you will need to call us to receive a validation code. However, assisted support for discontinued products is no longer available. If you have a discontinued product, we recommend that you upgrade your version of QuickBooks Desktop (US, Canada or UK)
ERROR: "THE VALIDATION CODE IS INCORRECT. PLEASE VERIFY THE NUMBER AND ENTER IT AGAIN."
One of the following errors occurs after entering the validation code during the QuickBooks registration process:
- The Validation code is incorrect. Please verify the number and enter it again.
- This service is temporarily unavailable. Please try again later.
- Incorrect license number, product code, or validation code.
- System date is incorrectly set to a year in the future or in the past.
- The CREDHIST file is read-only.
- Damaged Microsoft Windows profile.
- Damaged EntitlementDataStore.ecml file.
- Microsoft .Net Framework security settings are set too high.
- Damaged Microsoft .Net Framework component.
- Go to Help and About QuickBooks.
- Verify that the license number and product code match the one provided to you, either via email, letter or on the sticker in the product package. If these don't match, contact Intuit.
- If you have not registered, or have been given a validation code by a support agent, enter the six digit validation code now:
- Go to Help, select Register QuickBooks and Begin Registration.
- QuickBooks tries to connect and validate with Intuit's validation server. If the validation is successful, the Validation window opens, and you will need to manually re-enter the validation code you were given by the support agent.
- Close QuickBooks.
- Right-click the time display in the Windows taskbar and select Adjust Date/Time.
- Click the Date & Time tab, set the date for the current year, select Applyand OK.
- Open Quickbooks, go to Help, select Register QuickBooks and Begin Registration.
- Enter the Validation Code and click Next.
- Make sure that all protected operating system files and hidden files and folders are visible:
- Open my Computer or Windows Explorer.
- Select Tools and Folder Options.
- In the Folder Options window, select the View tab and in theAdvanced settings list, choose the Show hidden files and folders option.
- Select to clear the Hide protected operating system files; chooseYes if prompted and OK.
- Navigate to the appropriate folder below for your operating system ([current user] is the login ID of the person currently logged in):
- Windows XP: C:\Documents and Setting\[current user]\Application Data\Microsoft\Protect
- Windows Vista: C:\Users\[current user]\AppData\Roaming\Microsoft\Protect.
- Locate the CREDHIST file, right-click the file and select Properties.
- In the CREDHIST Propertes window, locate the Read-only box. If the box is checked, click the box to uncheck and OK.
- Open QuickBooks, go to Help; select Register QuickBooks and Begin Registration.
Microsoft Windows XP
- Go to Start, select Control Panel, double click User Accounts, select Addand enter a User Name, choose Next.
- Select Other, choose Administrators and Finish.
- After creating the new user, log off of Windows and log back on as the new user.
- Open QuickBooks and register; go to Help, select Register QuickBooks andBegin Registration.
- If this resolves your error, decide whether to keep the new administrative user, or remove it and continue using the existing one.
Microsoft Windows Vista
- Go to Start, select Control Panel and Change account Type under User Accounts.
- When the User Account Control (UAC) window opens, select Continue, choose Add and enter a new user name and domain name, click Next.
- Select Administrator access for this new user and Finish.
- After creating the new user, log off of Windows and log back on as the new user.
- Open QuickBooks and register; go to Help, select Register QuickBooks andBegin Registration.
- If this resolves your error, decide whether to keep the new administrative user, or remove it and continue using the existing one.
- Be sure that you are logged in as the Windows Administrator on your computer.
- Go to Start, select Run and in the Open field, enter the appropriate command for your version of QuickBooks:
- QuickBooks 2008 & 2009: C:\Documents and Setting\All Users\Application Data\Intuit\Entitlement client\V5.
- QuickBooks 2008 & 2009 (Windows Vista): C:\ProgramData\Entitlement Client\V5.
- select OK.
- If the EntitlementDataStore.ecml file is missing, proceed to step 6.
- If the EntitlementDataStore.ecml file is present, delete it.
- Open QuickBooks and register; go to Help, select Register QuickBooksand Begin Registration.
Note: QuickBooks automatically recreates the EntitlementDataStore.ecml file when you open QuickBooks.
Microsoft Windows XP
- Insert QuickBooks installation CD, go to Start, select Control Panel and choose Add or Remove Programs.
- Select your version of QuickBooks and choose Change/Remove; Next and select the Repair option and Next.
- Open QuickBooks and register; go to Help, select Register QuickBooks andBegin Registration.
Microsoft Windows Vista
- Insert QuickBooks installation CD, go to Start select Control Panel, chooseUninstall a program under Programs group, and double click your version of QuickBooks to repair.
- When the User Accounts Control (UAC) window opens, select Continue and (optional) restart computer.
Note: If Microsoft .Net Framework 1.1 or Microsoft .Net Framework 2.0 (QuickBooks 2009-QuickBooks 2008) is not listed in the Administrative Tools, it is not installed on your system.
- Go to Start, select Setting and Control Panel.
- Windows XP: Double-click Administrative Tools.
- Windows Vista: Select System and Maintenance andAdministrative Tools.
- Double-click Microsoft .Net Framework 1.1 or Microsoft .Net Framework 2.0 Wizards and double-cick Adjust .Net Security.
- Select Make changes to this computer, choose Next; select My Computerand Next.
- Choose My Computer; Next. Move the securtiy slide bar to Full Trust and click Next; then click Finish. (Full Trust is the least restrictive setting).
- Open QuickBooks and register; go to Help, select Register QuickBooks andBegin Registration.
Uninstall Microsoft .Net Framework 1.1 or Microsoft .Net Framework 2.0
- Download and install the Microsoft .Net Framework Cleanup utility.
- Follow the onscreen steps to uninstall all versions of Microsoft .Net Framework.
Install Microsoft .Net Framework 1.1 or Microsoft .Net Framework 2.0
- Insert the QuickBooks installation CD; go to Start and choose Run.
- In the Open window, type the CD drive letter and than click OK.
- Open the ThirdParty folder:
- QuickBooks 2009: Double-click the DotNet20 folder and double-click dotnetfx20.exe.
- QuickBooks 2008: Double-click the DotNet11 folder and double-click dotnetfx.exe.
- Restart the computer.
- Open QuickBooks and register; go to Help, select Register QuickBooks andBegin Registration.